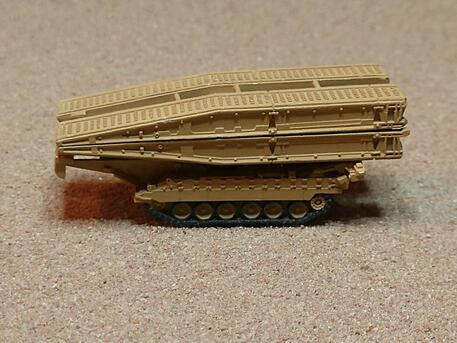
Well, I seem to be on a roll. After Last nights post, I decided to create another. The topic of today is the Titan Bridge layer. I did the bulk of the work a while ago, but failed to post anything about it.
In the last couple of years, I feel like GHQ has been really stepping up there game and releasing some quality pieces of Art. Now I know that these pieces are made to play with, but the level of detail is just beyond anything I could have hoped for at this scale.
As shown in the picture above, the bridge is not molded into the chassis and is separated into two pieces. This allows it to be used in the deployed position or in the stowed, as shown in the first picture. Since the bridge can be removed, it give GHQ more are on the vehicle to work there detail magic.
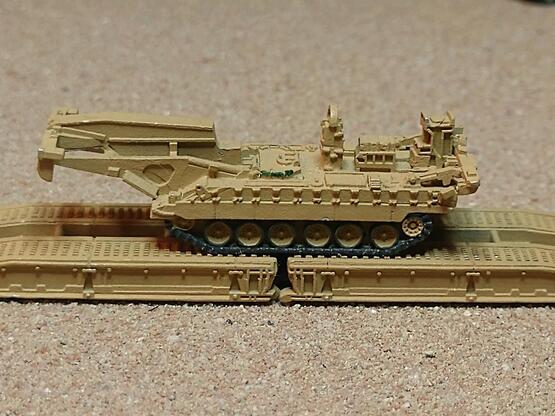
This closeup really shows off the quality of this miniature. Make no mistake, you pay for it as well. Do to the weight of the piece, there is only one to a pack and the cost is a staggering $11.95. Normally you get five vehicles for that price. However, you won't be fielding many of these, so I think its worth it.
With that said, this particular model required some adjustments so that the bridge would sit right and it was hard to identify how one of the pieces was installed. These are shown below.
With that said, this particular model required some adjustments so that the bridge would sit right and it was hard to identify how one of the pieces was installed. These are shown below.

The Object mounted on the aft of the chassis, arrow on the right of the picture, was hard to figure out how it was mounted. I scoured pictures on line and then reached out to GHQ. they provided some instructions on there site. This is shown below.
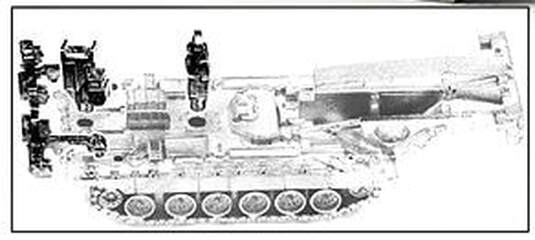
The other issue is the arrow on the left points to a support structure that was molded in a way that it extended too far back. This is the arrow on the right of the picture above. Because it was too far back, it caused one of the cross supports, of the bridge to conflict with the vertical structure on the back of the Titan (arrow pointing to the rear of the vehicle. The interference is shown below.
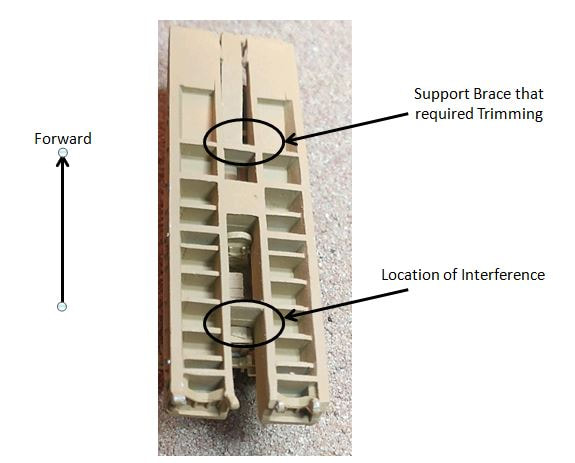
Due to the support brace being extended two far back, it conflicts with a cross member of a bridge section. this interns pushes the bridge back and then conflicts with the vertical piece at the back of the Titan chassis. As a result trimming needs to be done. This is shown below.
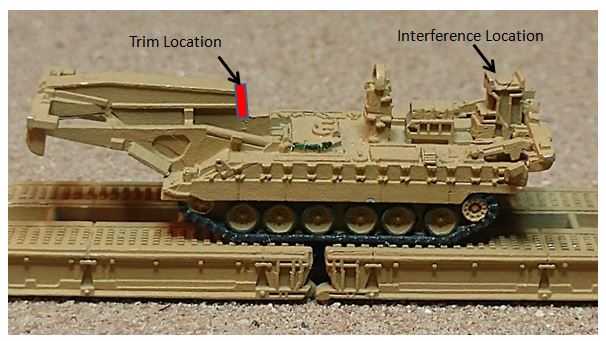
The trim location, identified in red, needs to be trimmed toward the front. I would start small and test fit until the cross member clears the vertical piece, at the back of the chassis, that is identified as the interference location. Other than that, a great model and once complete, you cannot tell there was an issue at all. Good luck and enjoy.
 RSS Feed